Change Product Image Sizes Without Re-Exporting: A FileSpin Guide
You already have the product photo in FileSpin. Now the storefront needs a larger thumbnail, the email needs a wide banner, and the partner feed needs a square image. Preparing a separate export for each one leaves you with another set of files to maintain when those requirements change.
Start with the photo you already have. This guide walks through copying its image link from the Dashboard, changing the size and crop in the URL, and checking the image FileSpin returns.
You will then add responsive image markup and check format negotiation, so your page can request an appropriate image for the screen. The guide also shows where to update your application or feed to use the new URLs.
By the end: you will have working thumbnail, preview and email-image links from the same asset, plus a repeatable pattern for the rest of your catalogue.
For every parameter with more recipes (quality, effects, rotation, downloads), see the companion reference guide, On-Demand Image Transformations: A Practical Guide.
Image sizes, crop examples and format negotiation last verified on 9 September 2026 using the public demo assets below.
The short version: upload and process the asset once, then request delivery variants through URL parameters. On-demand outputs generated from Standard Image Conversion do not consume storage quota; stored originals and Custom Image Conversions are separate. Different dimensions use different URLs; supported browser formats can be negotiated at the same URL.
1. Get your first transformation link
Every URL in this guide is the same shape, and the Dashboard will hand you one for your own asset. Start there rather than assembling a URL by hand.
- Open a processed product image in the FileSpin Dashboard.
- Choose Get link / Embed.
- Ignore Temporary download link (original file). That link is signed, expires in 24 hours and returns the original file — it is not a transformation URL.
- Under Permanent image links (resized), pick a size. Small, Medium and Large are 480×480, 1024×1024 and 2048×1536; Custom takes your own width and height.
- Leave Format on Auto (best for each browser) for now. Section 4 explains what that setting does and when to override it.
- Press Copy link.
You now have a working URL that looks like this:
https://<your-cdn-host>/api/v1/assets/<your-asset-id>/conversions?resize=480,480
That one link contains both things the rest of the guide needs:
| Part of the link | What it is | Where it comes from |
|---|---|---|
https://<your-cdn-host> | Your account's CDN host | Your account, including a custom enterprise CDN host where one is configured |
/api/v1/assets/<your-asset-id>/conversions | The asset and its transformation endpoint | Fixed for that asset — you never change this part |
?resize=480,480 | The instruction | The only part you edit from here on |
Everything after the question mark is what the following sections change. The asset ID and host stay exactly as the Dashboard gave them to you.
The dialog also offers Copy <img> code if you would rather start from a
complete tag.
Following along with the demo assets
The examples below use FileSpin's public demo photos on cdn.filespin.io, so
you can open every link as written before touching your own catalogue: a
landscape photo, 2e1bc0f4159343779b82923e951a9256, for sizing, and a
portrait, 3632004ce6214137b188e40e1c00af32, for the crop comparison. When you
apply the pattern for real, substitute the host and asset ID from your own
copied link.
Two conditions to check first
The image must finish processing before its normal ODI output is available. The
ODI overview explains
the ON_DEMAND_IMAGE entry in addons_info. An image requested immediately
after upload can temporarily return a low-resolution preview; allow processing
to finish before assessing quality.
These examples assume the image conversion is reachable with an unsigned delivery URL. If a conversion is private, the dialog offers no permanent link and points you to the Public switch in the Formats tab instead. For accounts using Secure ODI, follow the secure delivery instructions. Do not place an API key in browser code or a public image URL.
FileSpin normally renders ODI from its prepared Standard Image Conversion, so you do not need to export every requested delivery size yourself. Custom Image Conversions are a separate option: they are prepared and stored according to your account settings.
2. Request the sizes your channels need
The Dashboard gave you one size. Your placements need several, and each is the same link with a different instruction after the question mark. Start with this working demo image:
https://cdn.filespin.io/api/v1/assets/2e1bc0f4159343779b82923e951a9256/conversions?resize=300,300
resize=300,300 fits the image inside a 300-by-300-pixel box while preserving its proportions. It does not necessarily return a square. The demo source is 4:3, and this request returns 300×225 pixels.
To try another output, keep the asset path and replace the text after ? with one of the parameter sets below. Use & between additional options.
Choose the transformation according to the layout:
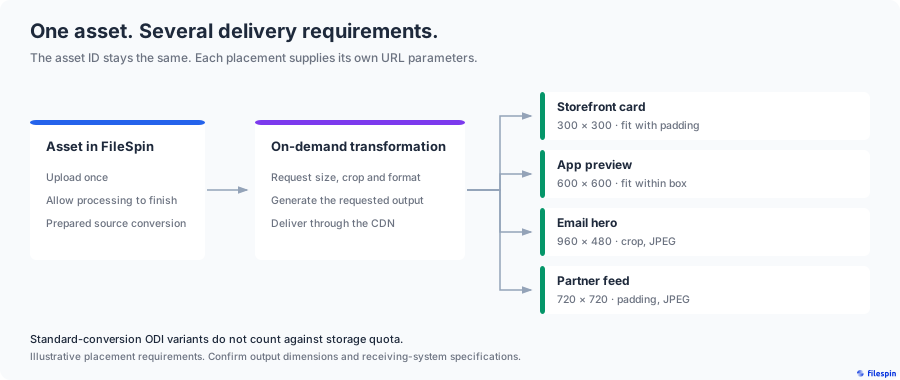
| Placement in this example | Parameters | Intended result |
|---|---|---|
| Storefront product card | resize=300,300,fill:white | Fit the whole product into a square with white padding |
| Mobile app preview | resize=600,600 | Fit inside a larger box without cropping |
| Email hero | crop=960,480,center&format=jpg | A wide crop with an explicit JPEG format |
| Partner feed image | resize=720,720,fill:white&format=jpg | A padded product image in the agreed format |
These are example delivery requirements, not specifications for every app, email client or marketplace. Confirm the receiving system's requirements before choosing its output.
Open the padded card, app preview, email crop or partner image.
The four requests were checked on the public demo asset: the outputs are 300×300, 600×450, 960×480 and 720×720 pixels respectively. All four requests use the same asset ID. If the storefront needs a larger card later, update the URL rule that constructs its image links; the existing asset can supply the new size.
For the complete syntax, see Resize, Crop and Format.
3. Make the storefront responsive
Keep placement sizes in a shared image component or feed configuration. When a placement changes, update that rule and deploy it through your normal application or CMS workflow. The stored asset can remain the same.
For a website, the browser also needs to know which image sizes are available. ODI supplies the images; HTML supplies the selection hints.
This example assumes a product card displayed at 300 CSS pixels on larger screens and nearly the viewport width on screens up to 600 pixels wide. The 300, 600 and 720-pixel crops provide candidates for different display densities. Use a source large enough for the largest candidate.
<img
  src="https://cdn.filespin.io/api/v1/assets/2e1bc0f4159343779b82923e951a9256/conversions?crop=300,300,center"
  srcset="
    https://cdn.filespin.io/api/v1/assets/2e1bc0f4159343779b82923e951a9256/conversions?crop=300,300,center 300w,
    https://cdn.filespin.io/api/v1/assets/2e1bc0f4159343779b82923e951a9256/conversions?crop=600,600,center 600w,
    https://cdn.filespin.io/api/v1/assets/2e1bc0f4159343779b82923e951a9256/conversions?crop=720,720,center 720w
  "
  sizes="(max-width: 600px) calc(100vw - 32px), 300px"
  width="300"
  height="300"
  style="display: block; width: 100%; max-width: 100%; height: auto;"
  alt="Demo photograph of a woman wearing a white top"
/>
This example crops because the demo is a lifestyle photo. For product cut-outs where the whole item must stay visible, use padding instead: resize=300,300,fill:white, and the same for the 600 and 720 candidates.
Match sizes to your actual layout and replace the example alt text with a useful description of the product. The w descriptors must match the returned image widths. Check those widths if the source is small or delivery constraints apply.
The browser uses srcset and sizes to choose a candidate. The asset endpoint does not discover your CSS layout and choose a new width on its own. See the HTML image element reference for how these attributes work.
4. Allow browser format negotiation
The responsive example deliberately omits format. For supported browser requests, FileSpin can choose AVIF or WebP using the Accept request header. AVIF delivery must be enabled in the serving environment. For ordinary JPEG delivery, the fallback is JPEG; PNG sources retain a transparency-capable fallback.
For the 300×300 demo URL above, live requests returned image/avif when AVIF and WebP were offered, image/webp when WebP was offered, and image/jpeg when JPEG was requested. All three returned 300×300 pixels. The output format changed while the URL and pixel dimensions stayed the same.
This is the part that works at the same URL. You do not need separate AVIF, WebP and JPEG URLs in your markup just to negotiate formats. You still need the size-selection markup from the previous section.
To check delivery, open your browser's Network panel, reload the image and inspect:
- The image request's
Acceptheader. - The response's
Content-Type, such asimage/avif,image/webporimage/jpeg. - The rendered dimensions and transferred bytes.
The extensionless URL alone does not tell you the returned format. When a downstream system needs a fixed format, specify it explicitly:
https://cdn.filespin.io/api/v1/assets/2e1bc0f4159343779b82923e951a9256/conversions?crop=960,480,center&format=jpg
Use an agreed format for email and partner feeds, then test it in the receiving systems. FileSpin's Campaign Link Builder also specifies JPEG for its default email-hero placement. That choice avoids depending on browser-style format negotiation in an email workflow.
5. Choose crops deliberately
A portrait does not automatically make a good wide banner. Use the second public demo photo to compare two 600×300 crops:
https://cdn.filespin.io/api/v1/assets/3632004ce6214137b188e40e1c00af32/conversions?crop=600,300,center&format=jpg
https://cdn.filespin.io/api/v1/assets/3632004ce6214137b188e40e1c00af32/conversions?crop=600,300,face&format=jpg
| Centre crop | Face-aware crop |
|---|---|
 |  |
Open the centre crop or face-aware crop to inspect the full output.
Both images are actual FileSpin outputs at 600×300 pixels. In this example, the centre crop cuts through the upper part of the face. The explicit face option shifts the crop upward to keep the face in frame. Only the alignment parameter changes.
Review both outputs. Smart cropping is useful when the person is away from the centre, but it cannot guarantee that every face, garment detail or brand mark stays visible. For product cutouts where the whole object matters, use proportional resizing with padding. For art-directed photography, choose an explicit alignment or crop region and inspect the result.
The Campaign Link Builder applies this same idea to selected channel placements: it constructs image URLs with placement dimensions and tracking parameters. Keep its output tied to the receiving channel's needs, and inspect tall crops rather than assuming a preset guarantees the final resolution.
6. Check delivery before expanding
The published ODI overview describes a standard delivery envelope of 2048 pixels wide by 1536 pixels high, with 72 PPI metadata. Keep this walkthrough inside that envelope. The Dashboard's own Custom size clamps to those bounds before it builds a link, which is a useful confirmation of where the ceiling sits.
A URL accepting your dimensions is not proof of the resulting resolution. The source matters as much as the ceiling. Requesting resize=3000,3000 from the landscape demo asset returns HTTP 200 and a perfectly good image — at 1024×768, because resize fits within bounds and does not upscale, and that is the largest output this asset has to give. Nothing in the response announces the difference. Check the pixel dimensions you actually received, especially for your largest placement.
Pixel dimensions determine how much image detail you have for a screen. Changing the quality parameter does not turn a standard ODI output into an archival master or a print export. Use the original or an appropriately configured conversion when you need that output.
For a catalogue rollout:
| Check | What to verify |
|---|---|
| Framing | Landscape photos, portraits, transparent cutouts and group shots work in the intended placements |
| Dimensions | Actual output widths match your HTML descriptors and receiving-system requirements |
| Formats | Browser negotiation works on your CDN host; fixed-format outputs work in email and feeds |
| Access | Public and private conversion settings produce the access behaviour you intend |
| Performance | Measure both first requests and repeat requests on representative assets |
| Integration | The deployed component or feed uses the new URLs and can be rolled back |
On-demand outputs generated from Standard Image Conversion do not consume storage quota. Stored originals and Custom Image Conversions are separate, and processing and delivery remain subject to your account's terms — none of this makes the pipeline free. Assess your account's usage and commercial terms separately. A useful pilot measures image bytes, request performance and the work required to change a placement, rather than assuming a universal savings percentage.
Best practices
Keep your size and crop rules in one shared place. Use a bounded set of sizes so every small layout change does not create another delivery variant. Preserve the whole product where its details matter, and use explicit smart cropping for suitable lifestyle photos.
When signing ODI URLs, include the final transformation parameters before signing. Changing a size afterwards requires a newly signed URL. Follow the signed URL reference for the complete expiry and signature requirements.
Next steps
Choose one product category and connect its card, detail view and email image to the same FileSpin assets. Check the outputs, then change one placement size through the shared URL rule. That is a small, repeatable test of ODI's value in your own catalogue.
- ODI overview and limitations
- Resize and padding
- Crop alignment
- On-Demand Image Transformations: A Practical Guide: every parameter, with recipes
- Build repeatable workflows